
The current Dimraeth walkthrough spine is Lost Caverns → Sanctum opening → Earlwood → Wildwood → Goblin King → Forest Path → Aelwynor the Wildroot Father. Keep the main objective visible and use side quests, Deeds, crafting, and base work when they solve a specific problem. Do not treat every icon as a campaign requirement. After Aelwynor, the documented Early Access route shifts toward Deeds, Bounties, pets, Sanctum development, achievements, stronger builds, and remaining side content.
This page is a progression guide, not a transcript of every conversation. It identifies the next useful stage, what preparation belongs before it, and how to distinguish a route problem from a build problem. Exact quest wording and balance can change during Early Access, so the objective shown by the installed game remains decisive.
Dimraeth walkthrough route
| Stage | Main purpose | Useful preparation | Distraction to postpone when stuck |
|---|---|---|---|
| Lost Caverns | Learn the opening combat loop and clear the slime encounter | Test movement, attacks, and the current character kit | Rebuilding the character before seeing its basic tools |
| Sanctum opening | Establish the camp and unlock practical blueprints | Dismantle wreckage, place early survival structures, follow the active task | Large decorative projects |
| Earlwood | Open the village progression loop | Talk through key guild-hall conversations and inspect the board | Repeating low-value work with no current goal |
| Wildwood | Follow the forest campaign and regional objectives | Activate travel points and carry a focused loadout | Clearing every optional marker before advancing |
| Goblin King | Resolve the goblin storyline's major fight | Fix damage, survival, and supplies exposed by the route | Raising unrelated Deed difficulty |
| Forest Path | Return to the continuing forest storyline | Recheck the main objective after the Goblin King | Assuming repeatable content is the campaign endpoint |
| Aelwynor | Complete the current major Early Access story endpoint | Bring a tested build and deliberate preparation | Grinding indefinitely without applying rewards |
| Post-story loop | Develop builds and repeatable systems | Deeds, Bounties, pets, side quests, Sanctum, achievements | Expecting another unverified act to be live |
The route is intentionally compact. It tells you which broad objective owns campaign progress. Detailed mechanics such as crafting, storage, and spell equipment have their own pages so this walkthrough can remain useful when the quest log becomes crowded.
Character setup before the Lost Caverns
Race and class together shape the character's starting archetype. The documented character overview also identifies attributes, the skill tree, spellbooks, equipment, set bonuses, upgrades, and pets as later layers of the build. That amount of choice can make the opening feel more final than it is.
Choose a race-and-class combination whose basic playstyle you want to test, then enter the Lost Caverns. Do not attempt to solve the whole skill tree before using the starting attacks. The opening route gives you a safer place to learn commitment, stamina management, dodging, blocking, parrying, and enemy openings than a later boss.
The evidence describes combat as deliberate rather than button-mashing. That makes control familiarity part of route preparation. If the first ordinary enemies are already draining every resource, slow down and read their attacks. A map cannot solve a timing problem.
The Dimraeth classes overview compares the current class choices, while the Dimraeth skill-tree guide explains how the wider progression layers fit together. Use those before copying a build that depends on spellbooks or set pieces you have not reached.
Lost Caverns and the first boss
The opening path through Lost Caverns is described as linear in the documented Early Access run. Continue through the cave and defeat the slime boss at the end. When the route opens into the next area, the Sanctum introduction begins.
Treat this first boss as a control check. The useful outcome is not merely reaching the exit; it is learning whether the character can avoid attacks, manage its resource, and create a safe damage window. If the fight fails, change one thing at a time: positioning, attack timing, defensive input, or available preparation. There is not enough evidence here to prescribe a universal build for every race-and-class combination.
Do not grind opening slimes indefinitely. The route ahead introduces the systems that create meaningful upgrades. Repeating a low-value enemy without a named target delays access to the village, crafting, spellbooks, equipment variety, and quests.
Once the boss is down, leave the cavern and follow the nearby story conversation. The next stage is not another dungeon; it is the opening work that turns the damaged area into the Sanctum.
Sanctum opening before Earlwood
At the future Sanctum, speak through the mage's dialogue and follow the dismantling request. The reproduced route then has the player place a tent and campfire and prepare food and water. Completing the sequence exposes useful blueprints, including the Workbench, Alchemy Table, and storage chest.
Keep the base minimal at this stage. The practical goal is to satisfy the active objective and open the next travel step. The evidence supports building houses, farms, facilities, and other systems later, but it does not require a finished settlement before Earlwood.
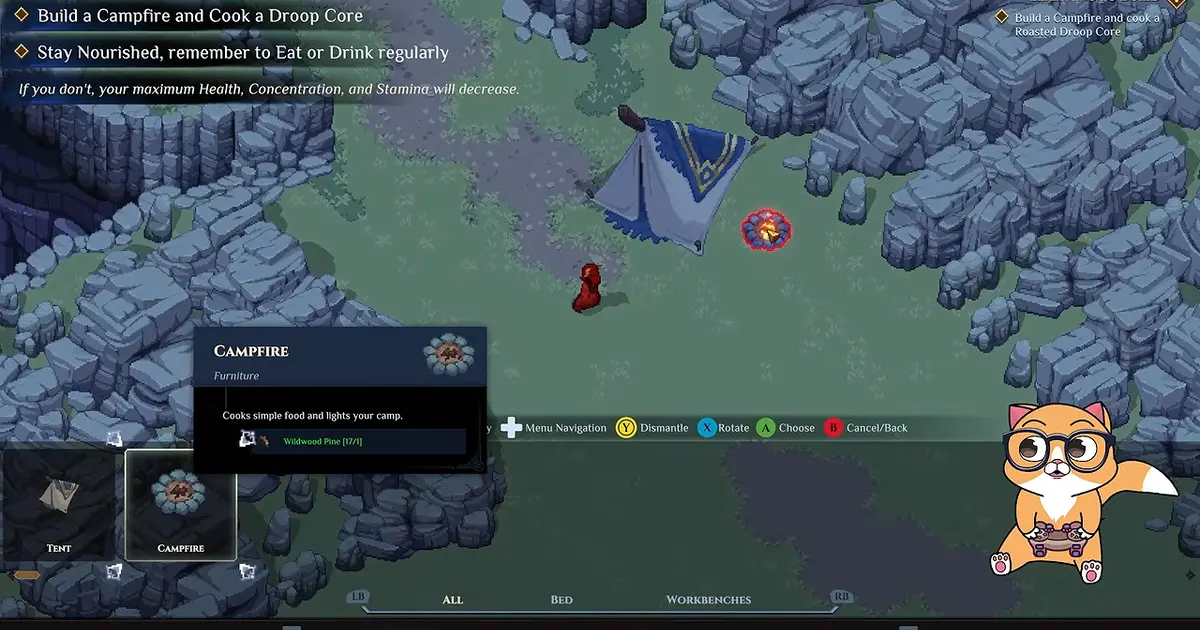
The opening Sanctum loop uses practical structures such as the Tent and Campfire before larger base projects.

Official Earlwood Village artwork helps identify the first settlement stage. It is not a route map or an exact quest-marker screenshot.
After the opening work, speak with the mage near the Sanctum Waygate again. The documented route then enables travel to Earlwood. If that transition does not appear, reread the current objective and verify that each placed structure was also used in the required way.
The Dimraeth base-building guide covers the Workbench-first approach, while the Dimraeth storage guide explains how to handle early materials without turning the camp into a large construction detour.
Earlwood progression loop
Earlwood is the first major conversation and preparation hub. Talk to the characters relevant to the active objective and exhaust the important guild-hall dialogue. The documented opening route specifically sends the player inside the Great Hall, where a conversation can provide a class-dependent spell and training progress.
Inspect the quest board before leaving, but separate available work from required story progress. Board activities can supply experience, materials, or repeatable goals. They can also remain available while the campaign expects you elsewhere.
A useful Earlwood departure check is:
- the current main objective names the direction or region you intend to follow;
- key dialogue for that objective has been completed;
- useful board work has been accepted without replacing the main route in your attention;
- the inventory has enough free capacity for the next area's drops;
- the character's active spells and equipment have been inspected;
- nearby travel access has been activated when available.
The route north from the opening village passes through the broader farmland and crossroads progression in the documented gameplay. Continue following the main objective into Wildwood rather than treating every field encounter as a mandatory clear.
Wildwood story and regional navigation
Wildwood is where the campaign begins competing with useful distractions. Side quests, exploration finds, spellbooks, events, resources, recruits, and base materials can all appear worthwhile. The walkthrough evidence recommends keeping the story spine visible and taking optional content when it solves a current problem.
Use the map to answer one question at a time. If the problem is “where is the active objective,” follow its region, available route, and nearby travel point. If the destination is known but combat is consuming all healing, stop searching for another road and repair the character.

Official forest artwork represents the Wildwood environment. Its paths are not a literal map of the current objective.
The early forest route includes the Lost Child progression before the later goblin storyline. The Dimraeth Lost Child guide narrows that search to River's Grove and explains why the broad objective circle can be misleading.
Activate waygates while progressing. The documented route uses teleporting to move between the Sanctum, Earlwood, and later objectives. A waypoint turns a failed preparation into a short correction instead of a full repeat trek.
Goblin storyline and Goblin King
The broad campaign next runs through the goblin storyline and culminates in the Goblin King. Available records do not preserve every intermediate quest name, so use the game's main-objective text to identify the next goblin step instead of relying on a fabricated sequence.
Before the major fight, diagnose the route into categories:
Navigation state
The objective or required area has not been found. Return to the last story conversation, reread the log, and use confirmed region access. Do not solve this by grinding levels in place.
Preparation state
The destination is known, but ordinary enemies exhaust supplies. Return to storage and the relevant station, reduce unnecessary carried weight, prepare useful consumables, and confirm equipped spells.
Build state
The character reaches the boss but cannot create enough damage or survive mistakes. Inspect set effects, spell synergy, attributes, upgrades, and whether the intended abilities are actually active. The Dimraeth builds guide helps separate playstyle direction from one unverified “best” setup.
Execution state
The build is capable, but a specific telegraph repeatedly ends the attempt. Practise that response at the current setup before farming unrelated equipment. More damage does not replace recognising the attack.
After the Goblin King, reread the main objective. The next campaign step returns to the continuing forest storyline; it does not require treating Deeds as the end of the story.
Forest Path and Aelwynor
The current Early Access route continues into Forest Path and reaches Aelwynor the Wildroot Father as its major endpoint. Approach this stage with a build that has already been tested on the route, not a collection of newly equipped pieces whose interactions are unknown.
Prepare through a short loop: unload unrelated materials, repair the carried-weight problem, refill the consumables the current system supports, check active spell slots, read set bonuses after any equipment change, and use food or other preparation based on the fight you are entering. The evidence supports meaningful food, potions, crafting, upgrades, and build specialization, but not one mandatory recipe for Aelwynor.
If the fight fails, record why. A single devastating attack suggests execution or survival. A long attempt with no progress suggests damage or build synergy. Reaching the boss nearly empty suggests the approach route or supply plan. Each diagnosis leads to a different fix.
The endpoint label is version-scoped. It describes the documented Early Access campaign, not the final planned game. Do not invent later act bosses or quests because the story clearly intends to continue.
Side content without losing the route
Take optional content when it pays for the next campaign step. A side quest may provide experience or a useful service. A spellbook can open a build option. Sanctum storage can solve encumbrance. A board activity can provide materials. A pet can support combat. None of those systems automatically becomes the main story because it unlocked.
Use this decision order:
- Name the current blocker: route, survival, damage, supplies, or access.
- Pick the smallest activity that addresses it.
- Apply the result to the character or base.
- Return to the campaign and test whether the blocker changed.
This prevents a common loop in which the player completes many activities but never spends the rewards or returns to the objective that prompted them.
For crafting, build only what enables the needed item. For storage, create enough order to prepare the next trip. For experience, use quests and progression rather than assuming ordinary enemy grinding is always efficient.
Walkthrough troubleshooting
| Symptom | Diagnosis | Next supported action |
|---|---|---|
| No route out of the opening camp | Sanctum objective is incomplete | Recheck dismantling, tent, campfire, food/water, and follow-up dialogue |
| Earlwood board has many tasks | Activity priority is unclear | Keep the main objective selected and accept optional work selectively |
| Wildwood circle is broad | Navigation is under-specified | Use the named sub-area and related quest state, not the circle edge |
| Main destination is known but travel is slow | Preparation or weight is failing | Store materials, activate travel points, and carry a focused load |
| Goblin route enemies drain every supply | Build or approach is underpowered | Fix the character before attempting the boss repeatedly |
| Deeds appear after a boss | Repeat content is competing with story | Reread the main objective and continue toward Forest Path |
| Aelwynor is complete and no later main quest appears | Current content endpoint may be reached | Shift to documented post-story systems without inventing another act |
When reporting a genuine blocker, preserve the exact objective text, last completed story conversation, current region, and version. “Nothing happens” loses the state needed to distinguish a missed interaction from unfinished Early Access content.
Post-story progression
After Aelwynor, the documented gameplay directs attention toward Deeds, Bounties, pets, Sanctum work, achievements, stronger builds, side quests, and farming. This is not one linear endgame ladder. Choose the system that advances the character goal you care about.
Use Dimraeth How to Unlock Deeds to understand the partially verified board state and tier logic. Use Dimraeth pet unlocks for the Myrll and individual-companion chain. Use the build pages when equipment and spell interactions, rather than story access, have become the focus.
The walkthrough remains useful after the endpoint because it establishes what has already been completed. If a later update adds campaign content, continue from the new objective displayed by the game, not from an unverified community prediction.
Early Access evidence boundary
The supported backbone is Lost Caverns, the opening Sanctum, Earlwood, Wildwood, the Goblin King, Forest Path, and Aelwynor. The material also supports a shift toward repeatable and character-development systems after that endpoint.
This page does not claim a complete list of intermediate quest names, exact objective coordinates, a universal character build, fixed boss numbers, or content beyond the documented Early Access state. Those details are either not reliably documented or vary with the player's character and version.
Follow the spine, solve the blocker in front of you, and return to the story after each detour. That approach keeps the campaign understandable without stripping away the exploration and build experimentation that make the route worthwhile.