
Elite bosses are a source of unique equipment sets, but a complete set may require more than repeatedly killing the boss. Dimraeth's repeatable Deed system includes former bosses and dungeons, and available developer comments connect elite bosses with unique sets and harder unlockable levels. A current community report also says some slots for a desired set can come from normal enemies on higher-difficulty mainline boss routes. Farm the entire reward path, not only the final health bar.
The evidence does not provide a complete current boss-to-set table, verified drop percentages, a pity counter or guaranteed clear counts. Use the Potential Loot display and the item names visible in your version. This guide focuses on choosing the right run, preserving active bonuses and diagnosing a missing piece without inventing a rate.
Dimraeth elite equipment farming plan
- Name the set and exact missing slot before accepting a Deed.
- Check whether the board lists the target reward in Potential Loot.
- Select the matching boss or mainline boss run.
- Choose a difficulty that can produce the needed tier while remaining repeatable.
- Clear and loot the normal enemies on the required route, not only the boss.
- Record which enemy or completion reward produced each relevant piece.
- Compare the functioning set bonus before equipping a higher-rarity replacement.
- Raise difficulty only when the current route is controlled and the harder level serves a defined need.
This sequence turns random repetition into an evidence-building farm. Even when a drop does not appear, the run tells you whether the route, level and loot pool are plausible.
Elite bosses, Deeds and unique sets
A developer comment quoted in the Steam discussion describes the Early Access end game as repeatable Deeds involving former bosses and dungeons. The same comment says elite bosses drop unique equipment sets and that Deeds have unlockable harder levels. An FAQ quotation in the thread also describes special loot after finishing the Act I story.
That supports three conclusions: repeat content belongs to the Guild Hall system, elite encounters are tied to named equipment, and difficulty progression is part of the reward loop. It does not prove that every boss drops every slot, that all sets are complete in the same way, or that the hardest unlocked level is always the most efficient farm.
Use the Dimraeth boss replay guide for the board unlock and repeat sequence. If a defeated boss is absent, solve that state before evaluating its loot.
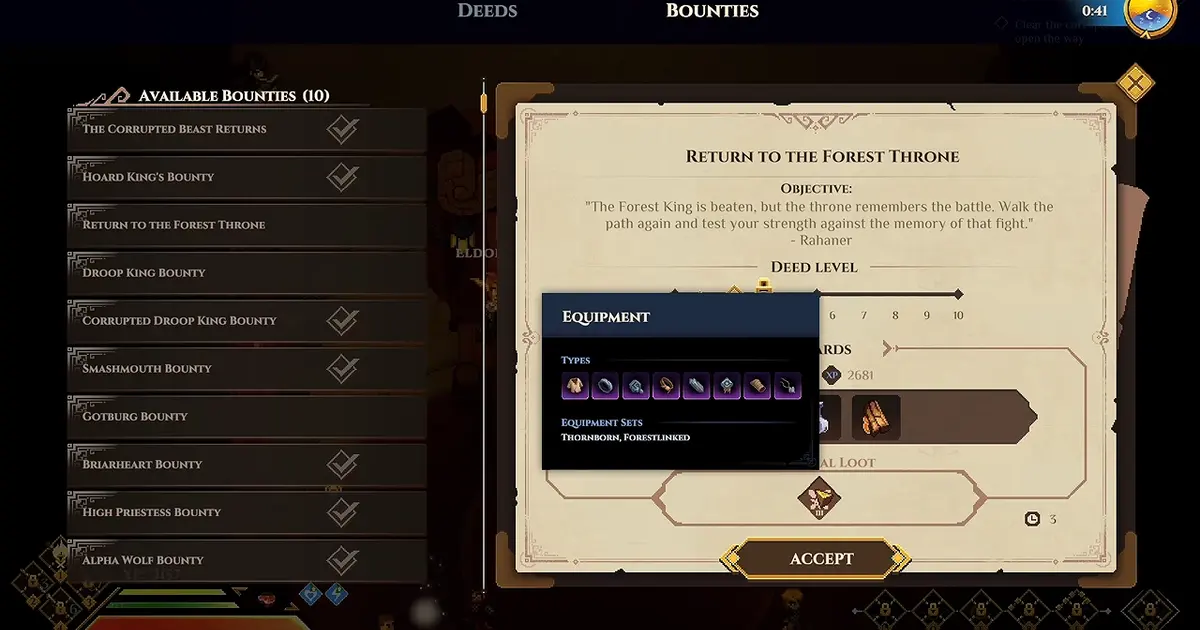
The board reward tooltip helps identify equipment and set information, but it is not a universal boss-to-set table.
Boss drops and route-enemy drops
The strongest current clue for completing a set comes from a Gorehorn discussion. One response says that some pieces can drop only from higher-tier mainline boss runs and that normal enemies on those runs provide a chance at Bracers and Emblems for the preferred set. Treat this as a community observation from the current Early Access window, not as a universal formula for every named set.
The practical lesson is broader and useful: identify whether the missing slot belongs to the boss reward or the route loot pool. If you rush past every ordinary enemy and open only the final chest, you may be skipping the part of the run associated with that slot. Conversely, clearing every optional enemy is wasted time when the board and your own records show the target only at completion.
Build a small ledger during farming:
| Run detail | Record |
|---|---|
| Deed name | Exact board entry |
| Level | Displayed difficulty or tier |
| Missing slot | Bracer, Emblem or another visible slot |
| Route drops | Set pieces from normal enemies |
| Boss drops | Pieces from the elite or completion reward |
| Time and cost | Approximate clear time and recovery used |
After several runs, that record is more valuable than an unsourced claim about a fixed percentage.

Official boss-combat imagery illustrates why route cost and encounter reliability belong in the farming record.
Equipment slots and named sets
The documented equipment reference describes eight gear slots and named pieces that can enhance particular spells. It also presents multiple quality tiers. Those facts explain why “I got the set” can mean different things: owning one named piece, activating an early threshold, or completing enough pieces for a later bonus.
Inspect the tooltip rather than assuming every set uses the same thresholds. The available table includes examples with bonuses appearing at different tiers, including three-, five- and six-piece points. Because the excerpt is incomplete, this page does not reproduce a supposedly exhaustive set list. Your item panel is the authority for the pieces you actually own.
The rune set and spell bonus guide explains how to compare a live bonus with a partial replacement. The central rule is simple: a higher individual item can still weaken the whole build if equipping it deactivates the effect the rotation depends on.
Match the set to the combat loop
A named set is useful when its active bonus supports something the build repeatedly does. A spell-changing effect belongs in a loadout that equips and uses that spell. A defensive trigger belongs in a plan that can activate and benefit from it. A damage-school bonus belongs with attacks that deal that damage, not with a build selected only because the item colour is attractive.
Write the loop in one sentence before farming: apply a status, trigger a supported attack, recover the resource and repeat; or survive an opening, create a control window and punish. Then read every candidate set piece against that sentence. If the item does not support a job in the loop, it may be storage or salvage material rather than an upgrade.
Do not copy exact build claims from a creator without matching race, class, learned spells and tree access. Dimraeth's combinations can have different basic actions and available modifiers. The skill-tree guide helps separate shared spellbooks from combination-specific branches.

Compare the functioning equipped package in the live panel before dismantling or replacing a set piece.
Choosing the Deed level
Harder levels can unlock and can carry stronger rewards, but “highest” is not synonymous with “best farm.” Select the lowest level that can plausibly produce the target piece, then measure reliability. If the desired slot appears only on higher-tier runs according to the board or a verified observation, move up to that boundary rather than climbing beyond it without a reason.
Evaluate the entire route:
- time spent on mandatory normal enemies;
- recovery items consumed before the elite;
- likelihood that one mistake resets the run;
- free inventory space for equipment;
- whether the target appears in the displayed potential loot;
- whether the higher tier adds a reward the build actually uses.
A lower run cleared four times cleanly can be more productive than a higher run cleared once after repeated failures. The evidence provides no formula that turns difficulty into a guaranteed drop, so efficiency must be observed.
Set completion without rarity traps
Early progression footage shows a creator keeping three Lifebloom pieces because their active bonus was more useful to that build than replacing one piece with an isolated movement bonus. The exact numerical comparison belongs to that recorded character and version, not every build. The general comparison is sound: evaluate the state before and after the swap.
Before equipping a new drop, note:
- the current individual stats;
- every active set threshold;
- the spell or action changed by those thresholds;
- the proposed item's stats and set affiliation;
- any threshold lost after the replacement;
- whether another stored piece can complete the new threshold.
Keep the old piece until the new package functions. Salvaging it immediately can strand the character between two incomplete sets. Storage is especially valuable while farming because the significance of a drop may become clear only after another matching slot appears.
Missing piece diagnosis
When one slot refuses to drop, start by verifying the slot rather than repeating faster. Check the names of owned pieces and the set affiliation on each tooltip. An Emblem and a visually similar accessory may belong to different sets. A piece with strong affixes is not automatically part of the package you are assembling.
Next, verify the source layer. If the missing slot has been observed from normal enemies on the mainline route, fully clear the relevant enemies at the required bounty difficulty. If it belongs to the boss or completion reward, reduce optional detours and focus on reliable clears. If the board does not show the set at all, confirm the selected boss and level before spending more consumables.
Finally, treat randomness honestly. Several failures show only that the drop was not obtained in those runs. They do not establish that the item was removed, and they do not reveal a percentage. The current evidence offers no published protection system that guarantees a piece after a stated number of attempts.
Farming normal enemies efficiently
Route enemies matter only when they belong to the relevant loot path. Clear mandatory packs in a consistent order so drops are easy to associate with the area. Avoid pulling several groups together if visual clutter causes deaths; a slightly slower safe clear protects the overall farming rate.
Leave unnecessary heavy materials in storage before accepting the run. Equipment, salvage items and crafting drops can fill capacity quickly. If movement changes during the route, use the Dimraeth movement guide to check encumbrance before blaming the bounty's enemy tuning.
Collect and inspect loot at safe points. Do not equip every matching name immediately in the middle of a run. A hasty swap can deactivate a defensive or recovery bonus before the elite fight. Mark the candidates mentally, finish the encounter with the working setup, then compare them in town.
Upgrade, salvage and storage decisions
Upgrades can add value to a working piece, while salvage recovers materials from gear you no longer need. Those are separate decisions. Do not salvage a duplicate simply because it has weaker current stats if it could complete a threshold for another character or replace a slot during a future transition.
Use three storage groups: active alternatives for the current build, incomplete named sets worth evaluating, and clear salvage. This reduces accidental loss and makes the next drop easier to classify. The evidence does not provide a universal best number of chests or a perfect sorting system; the goal is simply to preserve meaningful comparisons.
Upgrade after the set decision, not before it. Spending resources on every rare-looking drop converts an uncertain farm into a material drain. Confirm that the item belongs in the functioning package, then invest.
Solo and co-op set runs
For solo farming, favour a Deed level and route that remain repeatable without relying on another player's control or recovery. A build that clears once through perfect play may be a poor farming build if the next nine attempts are unstable.
For co-op, agree on the target set and loot expectations before starting. Current records do not document personal-versus-shared drop allocation for every reward state, so rely on what the current interface shows. Do not promise another player a specific piece or guaranteed number of runs.
Coordinate normal packs as carefully as the boss. If one player rushes the elite while another is still collecting a route drop, the group loses the benefit of a controlled record. Keep the level stable across a comparison session so that changes in drops and clear time are interpretable.
Claims not supported by the evidence
This guide does not claim a set percentage, a pity counter, a guaranteed piece after a certain number of kills, or a full current matrix of bosses and sets. It does not claim that every slot drops directly from the elite. It does not import drop rules from Crimson Desert, Elder Scrolls Online or any other game that appeared in noisy unrelated online pages.
It also avoids treating a wiki table as proof that every listed value remains current. Early Access can change names, thresholds, stats and availability. The item tooltip, board display and results from your installed build should win when they conflict with older material.
Efficient set-farm checklist
Before the next repeat, confirm:
- the exact set name and missing slot are written down;
- the chosen Deed corresponds to the intended elite;
- the target appears in Potential Loot or has a version-matched observed source;
- the difficulty is high enough for that source and low enough for consistent clears;
- normal enemies are included when they are part of the slot's source;
- inventory has room for drops;
- the current functioning set will not be broken during the run;
- actual results will be recorded instead of converted into an invented rate.
Farm until the stated need is met, then stop and rebuild deliberately. The purpose of an elite equipment set is to strengthen a coherent combat loop, not to keep a character on an endless treadmill after the useful threshold is already active.