
The most useful Dimraeth build choices are complete interactions: a way to apply an effect, a payoff that uses it, enough resource recovery to repeat the sequence and a response when the target fights back. Minotaur Brawler Bleed, Shadow Bleed and Human Mage Burning provide concrete directions to compare. Minotaur Brawler stun is another supported interaction, but its complete allocation is not established here.
These are practical build directions, not a tested S-tier ranking or a set of exact level-25 imports. Choose the case whose combat rhythm fits you, then check the prerequisites in your own tree. An attractive late interaction is not a substitute for a usable early character.
Dimraeth builds compared by their combat jobs
| Direction | Main interaction | Useful decision | Important limitation |
|---|---|---|---|
| Minotaur Brawler Bleed | Apply Bleeding and connect it to follow-up damage and resource choices | Preserve mobility while arranging the effect sequence | The demonstrated build changes over time; do not combine every intermediate choice |
| Shadow Bleed | Bleeding with positioning, ambush-style attacks and follow-ups | Decide how you create a safe opening | The example does not establish the best race or a complete final tree |
| Human Mage Burning | Apply Burning, then spread or consume it through chosen interactions | Decide who applies stacks and who spends them | Co-op examples do not establish a complete solo pure-fire loadout |
| Minotaur Brawler stun | Convert basic attacks to Blunt and build toward control | Confirm the conversion and its prerequisites | No permanent-boss-stun promise or full point route |
A build should solve a recurring fight problem. If you enjoy attacking close to the enemy, a melee interaction may suit you. If you want to organise a spell sequence around effects, a caster direction may be more interesting. Neither preference establishes the highest damage across every encounter.
Minotaur Brawler Bleed: keep the sequence moving
The Minotaur Bleed example develops from a deliberate melee character into a build with more useful movement and effect interactions. It uses the tree to improve what happens against Bleeding targets while changing the jobs assigned to active skills.
Vortex is a major part of the practical story. Its value is not only damage: movement can create an escape or a better position for the next attack. Before selecting a modifier that changes this behaviour, decide whether another action now covers that movement job.
The example considers a more stationary variation, then values retaining movement. That is a useful build decision because it connects the modifier to the encounter. A theoretical damage increase can be a poor trade if it removes the way you leave danger after a committed attack.
Separate Bleed setup from the payoff
Write down which action applies Bleeding and which action benefits from or consumes it. Do not assume that every blood-themed skill performs the same job. If a payoff requires a condition that no remaining action supplies, replacing a slot may break the sequence.
The same check applies to Rage. Identify the generator before choosing a spender. The demonstrated character changes those responsibilities as new options appear; a description from the beginning of the run and a later allocation are not necessarily parts of one simultaneous build.
Pulverize and Vortex therefore need to be assessed in the configuration actually being used. A long attack can expose the character while it resolves, while a movement skill can support both survival and resource generation. Compare those jobs rather than making the larger-looking hit the automatic choice.
Equipment goals and set counts
Gorehorn appears as a collection goal for the Bleed direction. That is useful as an example of planning around a set, but it does not establish a complete best-in-slot list or every current bonus value.
Check the active set count on your own equipment before dismantling a piece. The playthrough initially underestimates the available slots, then discovers additional accessory positions. An early claim that a larger set could not fit should not be treated as a final equipment rule.
Inspect the Codex when you have a set target. The recorded interface is used to connect sets with their source creatures. That is more useful than farming an arbitrary enemy based only on the set's name. The current entry should guide your target; this page does not promise a guaranteed drop rate.
Shadow Bleed: opening, follow-up and survival
The Shadow example includes ambush or rear-positioning play, Tendon Slice and Dark Convergence in a Bleed direction. It also uses a defensive pet effect. This is a different case from copying Minotaur's melee sequence onto any character with a Shadow label.
Start with the opening. If a chosen action benefits from positioning, work out how you reach that position without taking unnecessary damage. Then identify the follow-up and the ordinary attacks that restore the resource for another cycle.
A sequence that looks easy while a teammate occupies the enemy can demand more preparation alone. Do not transfer the result directly into a solo ranking. The opportunity to get behind a target, the enemy's attention and the time available to recover may all differ.
The defensive pet in the example also matters to the interpretation. If the setup relies on a barrier effect to survive a risky opening, removing that effect changes the case. A pet can be a useful addition, but it should not disappear from the explanation of why a particular attempt survived.
No race is assigned to this Shadow example without a verified identity. A rogue-like playstyle is not evidence that the character must be Elf. Use the Dimraeth races guide to separate racial basic kits from class effects before trying to reproduce the direction.
Human Mage Burning: apply, spread or consume
A Human Mage fire direction can begin with Burning application through Conflagration and Fireball. From there, choose an interaction that benefits from the status: spreading it with Oil, selecting a compatible spell modifier or using equipment that actually supports the effect.
Applying Burning and consuming Burning are different jobs. Combusting Fireball consumes stacks for a damage payoff. That can make it a follow-up to a setup action rather than the spell you cast without regard to the target's state.
Oil belongs in the preparation discussion as well as the damage discussion. If an intended sequence depends on an oil consumable, prepare it before the fight and check the relevant item slot and charges. A build description that says only “use Oil” is incomplete if the player has not arranged a way to apply it.
Fire does not have to occupy all five slots
A Human Magician example mixes fire, ice and curse-related effects in co-op. That is useful evidence for adding another function to a fire direction. It is not a complete pure-fire solo build.
A non-fire action may earn its place by creating an opening, helping control the fight or supporting the next sequence. Evaluate what it does alongside the main Burning plan. Five fire-themed icons are not automatically more coherent than a loadout with a clear utility choice.
Resource recovery remains part of the build. Human's sword-and-crossbow identity gives a basic-kit decision between casts. Check Weapon Swap's displayed cost in your version, choose the useful form and land ordinary attacks instead of repeatedly switching without checking the available resource.
Fire-related items found on another character are candidates to inspect, not automatic recommendations for Human Mage. A set effect, resistance bonus and temporary fire addition have different purposes. Read the condition that makes the item relevant before building around its name.
Minotaur Brawler stun: a supported interaction
A Minotaur Brawler keystone can convert basic attacks to Blunt damage. Blunt contributes strongly to hidden Stun Build-up, and filling that buildup stuns the target. This explains a control direction worth investigating.
It does not establish a universal stun threshold, duration or permanent lock against every boss. Nor does a Bleed-focused Minotaur's successful fight prove the performance of a complete stun setup. The conversion, its prerequisites and the active control tools need to belong to the actual character being evaluated.
Quick Jab, Pulverize and Boulder Toss appear in control-related discussion, but considering a skill is not the same as selecting and using it in a completed build. Treat those as things to inspect in the tree, not a finished five-slot list supplied by this guide.
The useful early question is whether you enjoy the ordinary Minotaur attack rhythm before the conversion is complete. If the plan only becomes appealing at a distant node, compare the cost of reaching it with the actions available during that journey.
Build around one effect before adding another
Effects such as Burning and Bleeding can be applied, maintained or consumed. Resource buffs can likewise have generators and spenders. List those relationships before spending points across several attractive branches.
A compact planning sheet can be as simple as this:
| Job | Your selected action or item | Check before relying on it |
|---|---|---|
| Apply the main effect | One dependable setup | It works in the opening you can create |
| Use the effect | A payoff or supporting interaction | It has the stated condition available |
| Recover casting resource | Basic attacks and any prepared support | The attacks connect rather than merely animate |
| Reposition | An available movement or defensive action | It remains present after modifier changes |
| Survive a failed opening | A practical response | It does not depend on an unequipped item |
This is a planning tool, not a requirement to allocate exactly one spell slot to each row. A single action can perform more than one job. The point is to notice a missing job before taking the build into a demanding encounter.
Skill points, requirements and the five-slot limit
The tree contains more choices than the Early Access point budget can buy. Count the connecting nodes and prerequisites needed to reach a desired interaction. A destination's description alone does not tell you the total cost of the route.
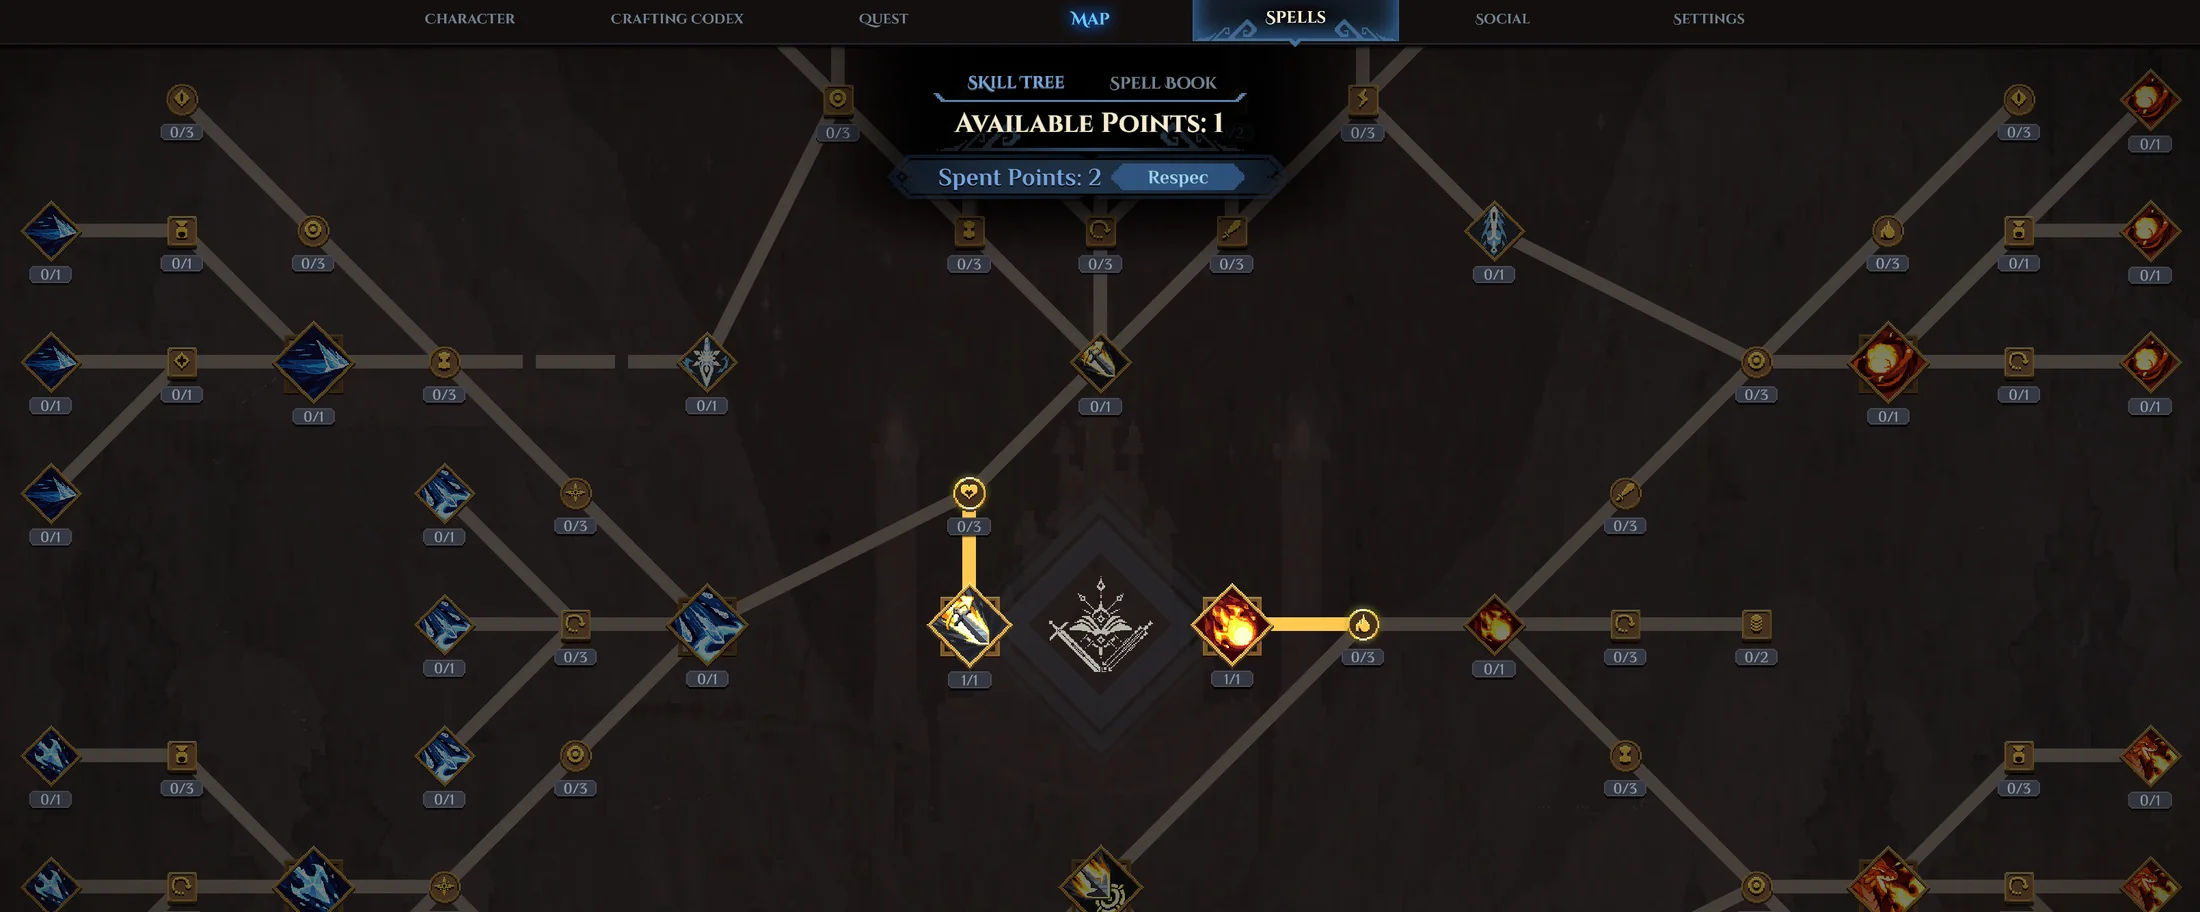
Connected branches in a development tree illustrate why a distant spell or keystone requires a route. This image is not a complete allocation for any build on this page.
Spell modifiers can be exclusive within an aspect. Do not combine every desirable variant in a written plan if selecting one replaces another. After changing a modifier, retest the action's behaviour rather than assuming its timing and purpose stayed the same.
World spellbooks can fill gaps, subject to their individual requirements. A useful book still needs to be obtained, learned and assigned. The Dimraeth spell-equipping guide covers those steps and the difference between an active spell and an equipment-triggered effect.
Five equipped spells also impose a practical limit. Adding a new action means considering what it replaces. If the removed action was the only resource generator or escape tool, the replacement changes more than the damage sequence.
Diagnose a build that stopped working
A build can become less comfortable after an apparently positive upgrade. Start with the most recent change and inspect the job it altered.
| Change | Possible consequence to inspect |
|---|---|
| Replaced a movement modifier | The previous escape route is gone |
| Added another stack-consuming skill | Two actions now compete for the same setup |
| Removed a resource-generating action | The spender cannot repeat reliably |
| Replaced a set piece | A triggered bonus is no longer active |
| Learned a new book | The spell may still need assignment or the right input |
| Joined a different party or world | Enemy attention, services and available openings differ |
Do not fix every problem by adding damage. If the character cannot safely finish an action, consider a shorter commitment or a different opening. If casting stops, inspect recovery and costs. If the effect disappeared after an equipment swap, inspect the set count.
Keep an early version that already functions
A later set or keystone should improve an existing combat plan rather than be the only reason the character can act. While collecting equipment, keep a working application, recovery rhythm and response to danger. Replace the temporary part only when the new condition is actually available.
For example, owning some pieces of a target set does not mean every set-dependent effect is active. Check the current count before removing the action that previously supplied that job. This lets the character progress toward the intended build without pretending the collection phase and the completed setup are the same configuration.
Test a direction before investing further
Use a familiar encounter and change one meaningful part of the build at a time. Record whether the intended effect occurred, whether the resource loop continued and whether the character had a way out when the opening ended.
A useful test can fail. Discovering that two skills compete for the same stacks is information that prevents more wasted investment. Discovering that a movement modifier is essential tells you why a nominal damage upgrade may be a poor fit.
Keep party conditions in the comparison. A setup supported by a teammate or defensive pet should be described with that support present. Do not call a co-op result a solo benchmark or compare a developed set bonus against a fresh character as though the builds were equally prepared.
For the initial selection behind these directions, read the Dimraeth classes guide. Choose a combination you can operate consistently, then improve its actual sequence. The useful “best build” is the one whose requirements, timing and weaknesses you understand well enough to use in the encounter ahead.