
To trigger a normal Final Attack in Dimraeth, let your basic attack chain reach its third hit. Do not keep resetting the chain to its opening swing. Final Attack is an attack condition that passives and equipment effects can use; it is not simply the last attack before an enemy dies.
There is also a skill-specific route: Frozen Strike can initiate a Final Attack when you attack after a fully charged strike. Use that route only if your equipped skill's current tooltip retains the stated condition. Do not assume that every charged spell or every skill named “strike” grants the same follow-up.
Separate the two routes before testing
| Route | What you need to do | Main condition to check |
|---|---|---|
| Normal basic chain | Continue the basic sequence through its third hit | The chain reaches its final swing instead of restarting |
| Frozen Strike follow-up | Fully charge Frozen Strike, release the strike, then attack | Your skill tooltip states that the charged follow-up initiates Final Attack |
These are different ways to reach the attack condition. The basic-chain route does not require Frozen Strike. The Frozen Strike route does not establish that every spell can skip directly to a Final Attack.
Also separate the attack from the bonus you want afterward. Reaching a Final Attack and activating a particular set effect are different checks. The set may require enough pieces and a successful hit, while another passive can have its own wording.
Finish the normal basic chain
Use a target you can approach without needing to retreat after every opening swing. Keep the target within the reach of your basic attack and let the sequence continue. Watch the attack animations rather than counting damage numbers from unrelated spells or equipment effects.
- Begin with basic attacks so the sequence is easy to observe.
- Continue the attack chain instead of stepping away after each opening hit.
- Watch for the third, final part of the sequence.
- Check that the attack connects if your intended bonus requires a hit.
- Only then check whether the passive or equipment effect occurs.
If you repeatedly see the same opening animation, first investigate whether your own movement is restarting the chain. Counting three separate first swings is not the same as reaching the third swing of one continuous sequence.
In the Brawler cleave example, the third hit is slower and adds more damage and Stun Build-up. Walking away between left clicks instead produces repeated first cleaves. That example explains a practical failure point: a player can keep attacking while never reaching the part of the sequence required for a final-hit effect.
Treat the slower cleave as an example of that weapon loop, not a universal animation or fixed damage multiplier for every race. Your own kit can look different. The useful check is whether its basic sequence finishes and whether the final hit satisfies the condition you are trying to activate.
Use Frozen Strike's fully charged follow-up when supported
Frozen Strike's tooltip distinguishes charging, releasing the strike and attacking afterward. The follow-up condition is tied to a fully charged strike. A short release or an unrelated charge does not establish that the same condition was met.
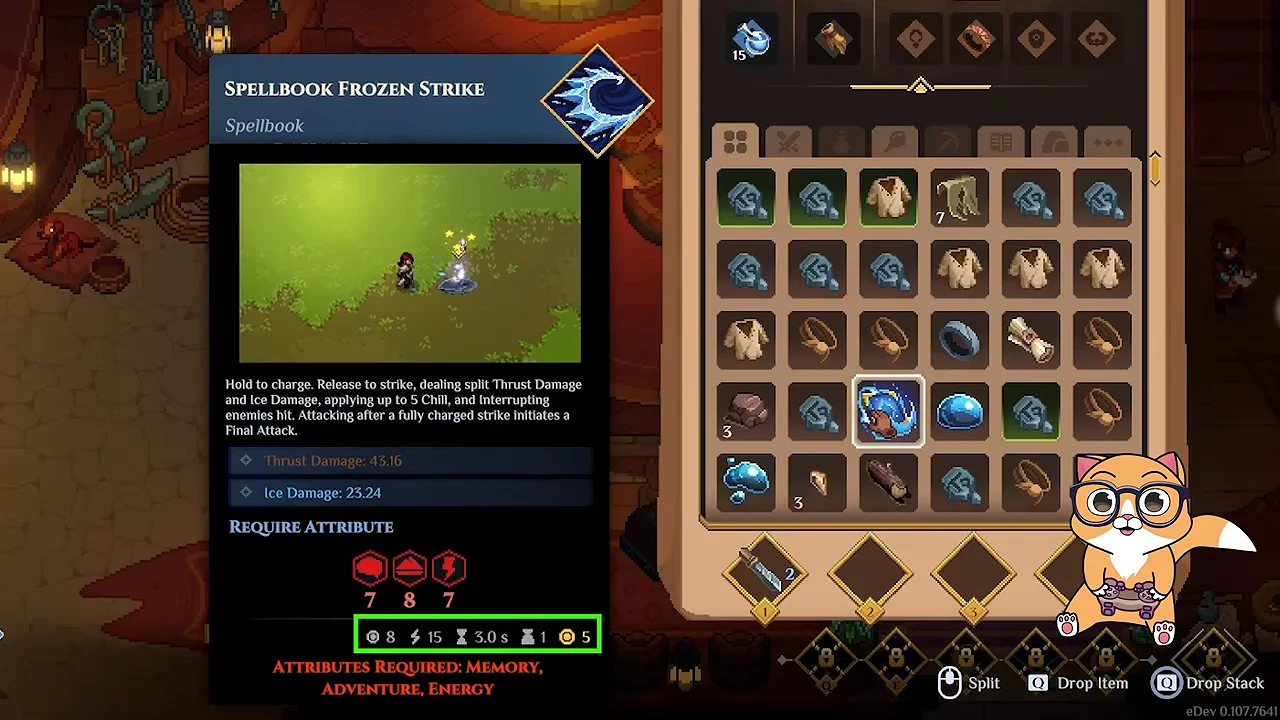
Recorded eDev 0.107.7641 tooltip: attacking after a fully charged Frozen Strike initiates Final Attack. Check the wording in your current version.
The displayed preview-build tooltip also lists 8 Concentration, 15 Stamina and a 3-second cooldown. Those values describe that recorded skill version, not the cost of a normal basic-chain Final Attack. If you cannot perform the charged opening at all, check Frozen Strike's resources and cooldown before diagnosing the follow-up. Compare the fields in your installed version rather than assuming the recording's numbers still apply.
Read the current tooltip first. When it states that attacking after a fully charged strike initiates a Final Attack, use the sequence in that order:
- Equip and prepare Frozen Strike through the normal spell interface.
- Hold its cast input to charge it fully.
- Release the input to perform the charged strike.
- Follow it with an attack.
- Observe the follow-up and any effect that depends on Final Attack.
Do not replace step four with another spell and assume it counts as the described attack. The wording names an attack after the charged strike. If the tooltip changes in your version, follow the current description rather than using an older interaction by habit.
The tooltip also describes split Thrust and Ice damage, Chill application and interruption. Those describe Frozen Strike itself. They do not establish a universal Final Attack damage formula, and its displayed damage numbers should not be copied as the expected result for every character.
For learning and assigning the spell, use equipping spells. This page focuses on the trigger sequence once the skill is available, rather than repeating the whole learning and slot-assignment procedure.
Read the effect's condition after identifying the attack
A passive or set description can add conditions beyond reaching the final part of a chain. Read the sentence containing Final Attack and identify the action it asks for. If it requires you to hit with a Final Attack, an animation that misses the target does not establish the hit condition.
Separate these questions:
- Did you reach or initiate a Final Attack?
- Did that attack connect with the intended target?
- Is the relevant passive or modifier selected?
- Are enough required equipment pieces equipped for the stated set effect?
- Does the description contain another condition that you have not checked?
This prevents a common diagnostic mistake: changing your input repeatedly when the missing requirement is actually in the loadout. It also prevents the opposite mistake, replacing gear when you are still restarting the attack chain after its first swing.
A skill-tree modifier and a set threshold are not interchangeable. Inspect whichever system supplies the effect you want. For connected nodes and modifier choices, use the skill-tree guide. Keep this page's test focused on the attack condition rather than rebuilding the entire tree.
Rootbound illustrates a final-hit set effect
The Rootbound three-piece example produces a root spike when you hit with a Final Attack. It is a useful way to understand how equipment can react to the attack condition: the chain supplies the trigger, while the equipment supplies the additional effect.
Check the set's own description before using that example in your loadout. Do not assume that wearing one Rootbound item activates the three-piece interaction, or that every final hit produces a root spike without the matching set requirement.
The example also does not establish a fixed spike-to-hit damage ratio, an exact proc chance, or a universal best equipment choice. Use it to understand the condition and the piece threshold. Inspect your actual equipped set and combat result before treating it as a working part of your build.
For collecting set pieces, use the elite equipment drop guide. Farming locations are a separate task from confirming whether your current attack triggers an effect.
Diagnose an apparent failure one layer at a time
| Symptom | Check next |
|---|---|
| You see repeated opening swings | Whether movement between attacks restarts the chain |
| The chain reaches its final animation but no hit lands | Target position and reach |
| A Final Attack lands but the expected set effect is absent | Equipped piece threshold and the current effect description |
| Frozen Strike does not provide the expected follow-up | Full charge, release, next attack and current tooltip wording |
| A spell deals damage but no Final Attack effect appears | Whether that spell explicitly initiates Final Attack |
These are checks rather than guaranteed diagnoses. A missing effect can have more than one cause. Keep the test simple enough that you can see the difference between a restarted chain, a missed hit and an inactive loadout condition.
Start with the normal chain before adding spell follow-ups. If you can reliably observe its final hit, then test Frozen Strike separately with its stated charge condition. After each route is clear, add the equipment or passive effect you actually want to use.
Avoid using an enemy's death as the only signal. A killing blow can happen on an opening attack, a spell or a damage effect. The name Final Attack refers to the trigger condition, not the fact that the target happened to die.
Make room for the final hit without forcing every opening
A slower final swing may need a longer safe opening than a first swing. Do not remain in danger just to finish the count. If you have to move away, accept that the next attempt may need a fresh sequence instead of assuming the chain must persist through every reposition.
The goal is to recognise which attacks your build needs and when the target gives you enough time to execute them. A build that relies on a final-hit effect needs opportunities to reach that condition; repeatedly cancelling it for faster first swings changes which benefits you receive.
Movement and resource recovery remain related tasks, but they do not define the same condition. Use movement controls for repositioning and Concentration recovery for the broader casting loop. Here, confirm the attack sequence, the successful hit where required, and the exact modifier or set condition that uses it.