
Find Gorehorn through wolf encounters and bounty routes
Gorehorn is a physical combat set whose Bloodfrenzy bonus rewards attacking bleeding enemies. The illustrated Early Access Codex entry names Wildwood Aetherfang Wolf and Wildwood Wolf under Dropped By, and Wildwood Forest under Found in Chests. For missing pieces, check those sources in your current Codex, then use unlocked bounty routes to revisit the relevant encounters. Recorded wolf routes approach the Corrupted Treant rather than relying on the boss itself to deliver every piece.
Higher bounty routes are also where players report finding the less familiar equipment slots needed to complete a set. That makes story progress and bounty access important when your collection stops at a few early pieces. Repeatedly clearing the first wolves you meet is not an established way to obtain every slot, and a long run without a particular drop does not establish that the item is absent from the game.
A community farming recording shows a Corrupted Beast Returns bounty at level three and a wolf pack near the Corrupted Thicket approach. Another recording demonstrates killing wolves, leaving the Treant alive, and returning through a nearby revival point. These are useful observed routes, with checkpoint and patch limitations explained below. They are not a guaranteed drop schedule.
Match the set to physical attacks and Bleeding
The important distinction in Gorehorn is between the ordinary stat bonuses and Bloodfrenzy. The ordinary bonuses improve physical damage, attack speed, or critical performance at different piece counts. Bloodfrenzy adds a separate condition: the enemy must be bleeding for its increased physical damage taken to apply to your attacks.
The illustrated Codex entry shows these breakpoints. It is an Early Access example used for this October 9, 2026 update; check the current set tooltip after later patches before committing valuable replacements.
| Equipped pieces | Listed Gorehorn bonus |
|---|---|
| Three | +6% Physical Damage and +4% Attack Speed |
| Five | +6% Critical Rate; Bloodfrenzy makes bleeding enemies take +12% increased Physical Damage from you |
| Seven | +20% Critical Multiplier |
Bloodfrenzy is not described as an unconditional damage increase against every enemy. A build that cannot apply Bleeding reliably may still gain the listed ordinary stats, but it cannot assume the conditional benefit is active throughout a fight. Likewise, the bonus concerns physical damage; it does not establish an equivalent increase for unrelated elemental spell damage.
Read the damage types on your actual attacks. Gorehorn's slot pools include physical, blunt, strike, thrust, and bleed related stats, but a set name alone does not mean every roll improves the attack you use most. A physical character can still equip a poorly matched piece if its main benefit supports a different damage type or a resource the character rarely needs.
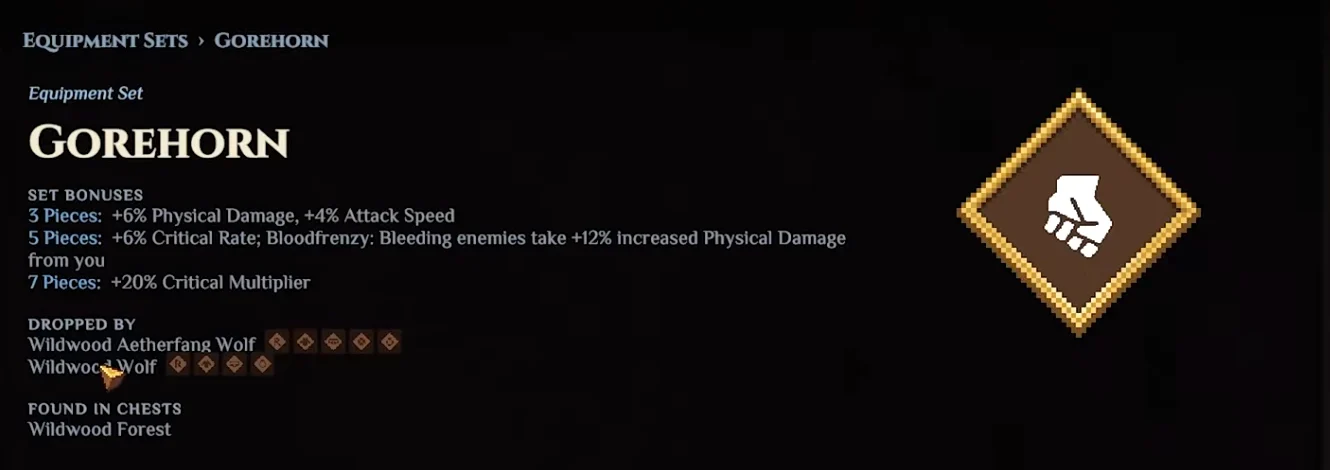
The Codex lists Gorehorn bonuses and names Wildwood Aetherfang Wolf and Wildwood Wolf as drop sources.
Keep Bleeding application in the equipment decision
A Bleeding focused character has two questions to answer before replacing gear: whether the new piece improves the attacks that establish Bleeding, and whether the final equipped set retains Bloodfrenzy. Looking only at the damage number on a single item misses the second question.
For example, replacing one of five equipped Gorehorn pieces with an attractive item from another set can remove the five piece bonus. The new item's individual stats may still make it worthwhile, but the comparison needs to include the lost set effect. Equipping a sixth Gorehorn piece, by contrast, does not reach the listed seven piece breakpoint by itself. Count equipped pieces after the change rather than treating every additional drop as a new bonus.
This is also why a new rarity color does not answer the upgrade question on its own. The relevant roll, its slot, and the set count all matter. No verified universal stat weighting establishes that every purple Gorehorn piece must replace every lower rarity item already in your build.
Track the slot you are actually missing
The community Gorehorn equipment listing separates Rune, Undercoat, Belt, Charm, Ring, Amulet, Badge, and Bracer. These slots have different primary stat pools. A repeated ring drop cannot fill a missing bracer slot, even when both carry the same set name.
| Slot | Primary stats in the listed equipment data |
|---|---|
| Rune | Physical, Blunt, Strike, Thrust, or Bleed Damage |
| Undercoat | Health, Armor, or Guard Efficiency |
| Belt | Health or Resistance |
| Charm | Stamina or Stamina Regen |
| Ring | Physical, Blunt, Strike, Thrust, or Bleed Damage; Attack Speed |
| Amulet | Attack Damage, Attack Speed, Critical Chance, Critical Damage, or Spell Haste |
| Badge | Physical Damage, Attack Damage, Critical Damage, or Bleed Damage |
| Bracer | Attack Speed, Bleed Duration, Max Bleeding, Spell Haste, Max Rage, or Rage Duration |
The table describes the listed primary pools, not guaranteed rolls on your next item. Secondary pools are wider, so two Gorehorn items in the same slot can still support different needs. A defensive Undercoat can coexist with damage or resource secondaries, while a Ring can carry Bleed Duration or Max Bleeding among its possible secondary stats.
The Bracer is particularly relevant when the search began with a missing final piece. Its listed primary pool includes effects that do not appear as primary options on an early Rune or Belt. Do not conclude that the set is incomplete in the game simply because your early wolf kills have not produced this slot.
Check the current item name and equipment slot together. Community discussions sometimes use broad names such as emblem for later gear, while the community calculator labels a slot Badge. Use the label displayed by your game when identifying what remains missing rather than assuming every informal name denotes an additional ninth slot.
Use a bounty to revisit the relevant enemies
A practical farming attempt begins by unlocking bounties through your normal progression and choosing a route that contains the wolf encounters you need. The recorded level three Corrupted Beast Returns route starts near the Corrupted Thicket approach and reaches a compact group of wolves. The recording distinguishes aether wolves from visually different purple wolves, so the enemy's appearance alone is not sufficient evidence that it drops Gorehorn.
Use your Codex drop information to confirm the enemy you are killing. This matters especially when several wolf types appear close together and multiple rune sets can drop along the same route. A bag full of useful equipment from other sets shows that the route is producing loot, but it does not prove that every enemy in it can produce the missing Gorehorn slot.
The recording identifies aether wolves through their ether projectiles, including a tail launched volley. The Codex names the relevant source Wildwood Aetherfang Wolf. Its projectile attack can help recognition, but the named Codex source is the more precise identification.
The same Codex image lists Wildwood Forest chests as a source. That gives chest rewards a place in the search without guaranteeing Gorehorn in every chest, identifying one fixed chest route, or establishing that every slot appears in every source. Higher bounty farming remains useful when early wolf encounters stop producing the slots you need; the exact drop rates and difficulty requirements for each piece are not established here.
Preserve the encounter before repeatedly resetting it
The recorded short loop leaves the Treant alive, kills the desired nearby enemies, then uses death and revival near a waypoint to revisit the pack. The route depends on leaving an encounter unfinished. Killing the Treant to complete the objective can change that situation and end the loop the player intended to preserve.
A separate equipment farming recording warns that opening a progression gate can stop earlier groups from returning behind that gate. Before using a demonstrated loop, identify the specific checkpoint or gate it preserves. An instruction to leave a checkpoint unfinished is not an instruction to avoid every switch throughout the entire bounty; another route may require an earlier switch simply to reach the farming section.
These death and checkpoint interactions come from player recordings. The footage's author explicitly raises the possibility that the reset behavior may not be intended. Accordingly, stop depending on the loop if your current build does not recreate it. Repeated deaths after the pack stops returning do not provide evidence that a drop is merely unlucky; the encounter may no longer be available to farm in that state.
The safer fallback is the game's normal bounty replay flow. Reopen the appropriate bounty and check its objective and enemy state, rather than expecting all field monsters to reset through one universal sequence. The official Hoard King cave reset fix is specific to the goblin caves and does not establish identical behavior for the Treant's wolf route.
Separate rarity goals from set completion
Recorded bounty farming at level three produces opportunities for purple equipment, but the farmer still reports mixed drops. A route that can award purple items does not guarantee purple Gorehorn, a specific slot, or an upgrade with the exact secondary stats you want. No verified drop percentage or kill count supports promising completion after a fixed number of loops.
Decide whether the immediate goal is reaching a set breakpoint or improving every piece's rarity. Those are different stopping points. A usable lower rarity missing slot may complete Bloodfrenzy while you continue searching for a stronger replacement. Conversely, a duplicate purple item may contribute nothing to the missing piece count if it occupies a slot already filled.
The September equipment update sets Mythical as the rarity cap and removes gold equipment. Old references to farming gold gear therefore do not describe the equipment system described by that update. Use the labels in your current item tooltip rather than extrapolating a higher rarity target from an older guide.
When farming with friends, a recording shows players obtaining their own personalized gear and handing suitable pieces to the person collecting the set. That is an observed way to help a collector, not a promise that every resource or every loot category is distributed independently. Check each received item's slot and stats before counting it as progress toward your target.
Evaluate a completed set in the encounters you play
Completing Gorehorn gives you a clearer equipment baseline, but it does not remove the need to maintain Bleeding and survive long enough to attack. If a replacement sacrifices the defenses or stamina recovery that let you keep pressure on an enemy, the listed offensive bonus alone does not establish better performance in that encounter.
The listed pools offer several ways to retain those needs without abandoning the set. Undercoat and Belt primary rolls focus on survivability, while Charm primaries focus on stamina. A damage oriented Ring or Rune can then support the attacks that matter to your build. This is a way to read the available slots, not a prescribed best roll combination or a tested damage ranking.
For critical bonuses, keep the Codex labels separate: five pieces grant Critical Rate, while seven grant Critical Multiplier. The entry does not supply a complete critical formula, and adding the two percentages together would not produce a valid total damage estimate.
Your final check is straightforward: confirm the equipped piece count, read the active set bonus, identify a reliable Bleeding application, and inspect the attack's physical damage type. Those checks explain what Gorehorn is doing for your character more accurately than a rarity label or the number of farming runs alone.